Category: Game Art and Design OUDF104


I think overall we have produced a very professional and tidy looking piece of work. My favorite aspect of the build has to be the balloons. I think the stand out from a distance and look incredibly effective holding up the land masses. We didn’t encounter many problems with the build but the was one major one. There was a problem with connecting the islands with bridges. Initially we had intended the bridges to connect to the top of the main platform and have the three different pieces of land at three different heights. But when it came to connecting them by a bridge the mainland was too high. The bridges would have been incredibly steep and therefore unrealistic. By this time i have most of the main land and cargo area built and it was a major job to move everything down. It involved making sure that every tiny little thing was selected and unlocked, It was a difficult process but I managed it. I didn’t want to drop the land too low so i kept the bridge to the pub connected to the main land but decided to move the shop bridge to the cargo area. This way we could keep the land at different levels without having a problem with the bridges.

I think we have some very nice features in out forts. I had the idea of trying to make a zoetrope somewhere in our fort and mary said she would quite like to put it in her shop and it looks really effective. The compass on top of the mainland is also a really nice feature, I think the combination of moving cogs and light  gives it a really nice effect at night. Corals lamps at the main entrance to her pub look very grand and add to poshness of her building.

We all had our own areas to work on. Mary had the shop, coral had the pub and I had the cargo and mainland area. I did find I was flying around helping Coral and Mary with their build too, with things like wall, textures and flooring. At one point i did feel very pressured because I had good skills I was more in demand. I did all the sculpties and that took up a lot of time, I also had the flying machine to build. But i enjoyed it a lot, I could have easily have spent another week on perfecting this build but I must must remember its a PROTOTYPE!!

This slideshow requires JavaScript.

This slideshow requires JavaScript.

Textures are important in Second life, it could make or brake your build and environment if you have poor textures. The most important thing would be to make your textures seemless. This way say if you wanted to tile a floor or wall the textures would fit together like a jigsaw and you wouldnt see the lines of the prims. To make a seamless texture you upload it into photo shop and set it to 512 x 512 pixels. The using the filter/offset tool you can turn the edges of the textures inwards. Then using the clone tool you can patch over the seems, repeat the proses a few times until you no longer get a seem and then export as a Taga and upload. To make a seamless texture for rock it is a similar proses except you duplicate the layer and erase the seems into the bottom layer.

In second life you can add scripts like rotation and animation to objects. We did a few in tutorials, I did one using and animation offset repetitive  script to make my photoshop image of birds seem to  fly. I could use this script to make the illusion of flame. One that made the texture move like an conveyor belt to give the illusion of falling water and a rotation script to make things rotate around a parent object. The rotation script will be handy for our brief esthetically as there will be lots of cogs and it would be grate to have them moving.


This slideshow requires JavaScript.

This slideshow requires JavaScript.

You can make a transparent texture using alpha channels in photoshop by saving selections and creating a new channel. This saves the selected are as trasparent in the saved file that you can then upload into second life for things like windows.

To achive shapes that we couldn’t get using prims we used sculptis. I did all the sculpties for the team using maya. They just told me what they wanted and I did it for them pretty quickly. The bonus of these sculptis was that we could use them an all the areas of our fort. Bottles could be used in the pup and the shop and the scuplties can be squashed and stretched to get different size and shapes using only one imported sculpti. Also like the trunks we can offset the textures and change the colors to make each one look different without having to import new textures and sculpties. I had to be careful to spread out all edge loops when modeling in maya because if i didnt that when I applied the texture it wouldn’t evenly distribute and would squash the texture. As well as evenly distributing the edge loops in Maya I could import a texture to Maya, test it out, adjust and them bake it out when I export the sculpti.

I was concerned with building the actual land that the fort would sit on. The idea is that these giant carvortie balloons have been anchored into the land torn out the ground, taking these buildings with them. So the shape needed to be jagged and to look like it had been pulled from the ground rather than manual removed.

Mary had a go using prims to create the shape by twisting and tapering large prims but the effect was just not working. It was blocky and the prims were not achieving the desired shape. So using the skills I had learnt in maya i played with the vertex’s to get the shape we wanted. I also imported a mossy rock texture in Maya and baked it out at 2048 pixels as it is such a large and main feature of the build, so the textures needed to look sharp.

This slideshow requires JavaScript.

I knew as soon as we were doing a cargo area, that I wanted it to include lots of trunks, as trunks feel very Victorian. I could make 3 or 4 master shapes and just amend the size’s and textures to make them look different so I did a few different shapes following reference images of Victorian trunks. I then tried my first texturing after our tutorial to have a go and see what I could achieve with the presets. If I played with the offset I could make the trunk look completely different using the same texture saving on lindens. I could also adjust the colors and add bumpiness to give them 3D texture although i didn’t like the look it gave it so scratched that idea. I also experimented in trying to make them with as little prims as possible by hollowing out cubes.

This slideshow requires JavaScript.

Using second life templates it is an easy way to apply your own clothing. They have templates for legs, skirt, jacket, arms and t-shirt, so you can paint or apply your own textures to make your own clothes. One thing I noticed, when I tried out the template on my avatar, was the lines don’t always line up and you get seems where you can see the skin or the avatar from underneath. so when I am painting the templates a just need to slip over the edges slightly to cover the gap.

This slideshow requires JavaScript.

These are just a few of the many snapshots i took throughout the build proses. The grass you see on the main land was later re-textured as wooden planks as the grass didn’t look right. Really like the glowing compass idea, think it is really effective.

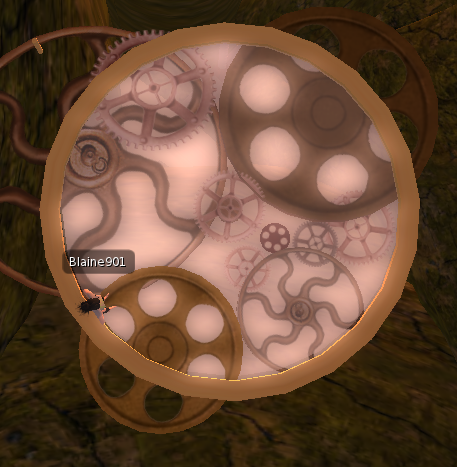
The feature that I have had the most comments about is my compass. I was adament that i wanted this on the main land from the start as some form of mavigation for the island inhabitants.The final look I think it has turned out lovely and I am very please with it. Initially I had plans to just have north, south, east and west on the outer ring and just have a transparent prim on top to stop people falling in but as I had gotten to grips with alpha channeled textures I thought of using a more appealing N,S,E,W design.

In the cargo room there are rotating cogs and a rotating beam  that reaches from the bottom rotating blades of the island, straight to the top of  the main land  and in the centre of the compass, designed to look like it is powering the island and i think it works quite well.

The face of the compass is filled with rotating cogs in different directions and different shapes and sizes. I only used textures for this insead of making a prim cogs to save on the prim count. The only problem with this is becuse of the transparent textures, at some angles, they are not visible but I dont think thats something I can help with out making a prim cogs.

Time and prim allowing i would like to add an annometer for effect, so it looks more used and practical, rather than just a pretty feature.